Travel Town for PC: Play, Download, and Maximize Your Experience
Want to enjoy Travel Town on a bigger screen with smoother performance? This guide walks you through how to play Travel Town on PC, which emulators to use, how to install it, and tips to get the most out of your desktop experience.
Travel Town is a vibrant merge puzzle game where you combine items to rebuild a coastal town. You:
- Merge over 500 objects
- Help 55+ quirky characters
- Earn coins to restore buildings
While it’s designed for mobile, playing on PC elevates the experience with better controls, visuals, and comfort.
Can You Play Travel Town on PC?
Yes, you can play Travel Town on PC using Android emulators like BlueStacks, NoxPlayer, LDPlayer, or MEmu. These programs simulate an Android environment, letting you install and play mobile apps on your Windows computer.
Why Use an Emulator?
- No need for a phone
- Full access to Travel Town via Google Play
- Use keyboard and mouse for easier gameplay
Many players who start with Travel Town on iOS later switch to the PC version for a more comfortable and immersive gaming setup; you can learn how to play Travel Town on PC here.
5 Benefits of Playing Travel Town on PC
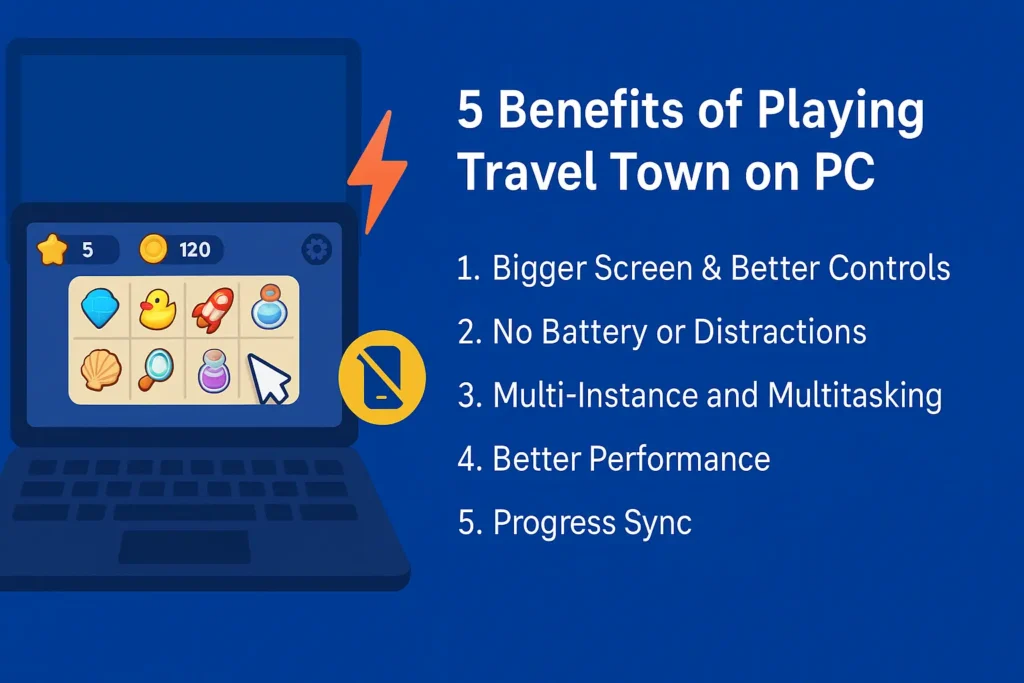
1. Bigger Screen & Better Controls
Enjoy a clearer, more immersive view of your town. Using a mouse for merging is faster and less tiring than constant swiping.
2. No Battery or Distractions
Play as long as you want without worrying about charging or notifications.
3. Multi-Instance and Multitasking
Run multiple accounts, switch between games, or play while watching YouTube on another tab.
4. Better Performance
Use your PC’s power for smoother graphics and higher FPS.
5. Progress Sync
Sign into your Google or Facebook account to sync your game across mobile and PC seamlessly.
How to Install Travel Town on PC (Step-by-Step)
Step 1: Download an Emulator
Choose a trusted emulator:
- BlueStacks
- NoxPlayer
- LDPlayer
- MEmu
Step 2: Install the Emulator
Run the setup file and follow the instructions. You might need to enable virtualization (VT-x) in your BIOS for better performance.
Step 3: Sign Into Google Play Store
Launch the emulator, open Play Store, and sign in with your Google account.
Step 4: Download Travel Town
Search for “Travel Town – Merge Adventure” and install it.
Step 5: Play!
Click the game icon in your emulator to start playing. Resize the window or go full screen for a better view.
Best Emulators for Travel Town
- BlueStacks: Most popular, great for beginners, supports high FPS and macros
- LDPlayer: Lightweight and fast, perfect for low-end PCs
- NoxPlayer: Great customization, ideal for power users
- MEmu: Good performance with low RAM usage
Travel Town PC System Requirements
Minimum:
- Windows 7 or higher
- Intel/AMD dual-core CPU
- 4GB RAM
- 5GB free disk space
- Virtualization enabled
Recommended:
- Windows 10 or 11
- Intel i5 or higher
- 8GB RAM
- Dedicated GPU (optional)
Tips to Maximize Travel Town on PC
- Use Key Mapping: Assign keyboard shortcuts for faster actions
- Enable Multi-Instance: Run multiple games/accounts
- Adjust Graphics: Tune emulator settings for smoother gameplay
- Sync Progress: Always log in with the same account
- Claim Free Rewards: Use PC browser to grab energy links from social media
Common PC Play Issues (and Fixes)
- Game Won’t Install: Restart emulator, clear Play Store cache, or try another emulator
- Lag/Freezing: Close other apps, increase emulator RAM, enable virtualization
- Controls Not Working: Reconfigure key mappings
- Progress Lost: Ensure you’re logged into the correct account
Travel Town on PC vs Mobile
| Feature | PC Version | Mobile Version |
|---|---|---|
| Screen Size | Larger, immersive | Portable, small screen |
| Controls | Mouse & keyboard | Touch controls |
| Performance | Smoother, high FPS | Depends on device specs |
| Battery/Disruption | No worries | Limited by battery/calls |
| Multitasking | Easy to run side-by-side | Less convenient |
Final Thoughts
Travel Town on PC offers a smoother, more immersive experience; with better visuals, comfortable controls, and no mobile interruptions. Whether you’re a casual player or a serious merger, the PC setup is a game-changer.
Best part? Your progress syncs across devices. So start playing Travel Town on your PC today and enjoy building your dream town without limits!
TravelTownFreeEnergyTeam
TravelTownFreeEnergy Team!
Looking for fresh, working Travel Town energy links every day? You've landed in the right spot! Our site delivers new, updated free energy links daily, so you can merge, complete orders, and build your town without delay.
We’re dedicated to bringing you the latest links; straight from official social media channels; along with expert tips to keep your energy levels topped up. Join thousands of gamers who trust us for the easiest, fastest way to stock up and stay in the game!